
We see the rapid emergence of new IT trends practically every month – and then watch most of them vanish just as quickly. At nine.ch we always try to keep abreast of the latest developments, so that we can find out what will truly benefit our customers. One technology trend that has been around for some time now is the running of applications in containers. Docker has become a common method for container virtualization (although they are not really new).
We therefore wanted to find out how we (and our customers) might benefit from this technology. But first we needed to figure out what we wanted to achieve, along with the needs of our customers in terms of container virtualization. So, time to kick off the survey and analysis phase!
Goal setting
In the process, we identified the following goals and sentiments:
- People like the freedom that Docker offer in terms of building systems.
- The deployment of Docker containers does not differ between the various phases of application development. Developers can create the Docker image themselves and then run it in the same way on different servers.
- Sometimes separate applications/services need to be run as a ‘root’ user (which isn’t possible using our Managed Servers).
- Scaling Docker containers horizontally is fast.
- The deployment of Docker containers shouldn’t be limited to one server. Rather, Docker should be used in clusters.
- Security is a high priority.
Because Docker containers also require less overhead than full or para-virtualization, we were most interested in the aspect of multi-tenant Docker clusters, which allow resources to be used in an optimum way. Whenever you want to use Docker on more than one server, we recommend using an orchestration tool. Docker Swarm, Fleet from CoreOS and Kubernetes are the most popular of these tools. We opted for Kubernetes. The underlying concept is particularly useful because it separates the individual functions into components, all of which can be controlled with an API. We were also excited by the implementation/abstraction of the network.
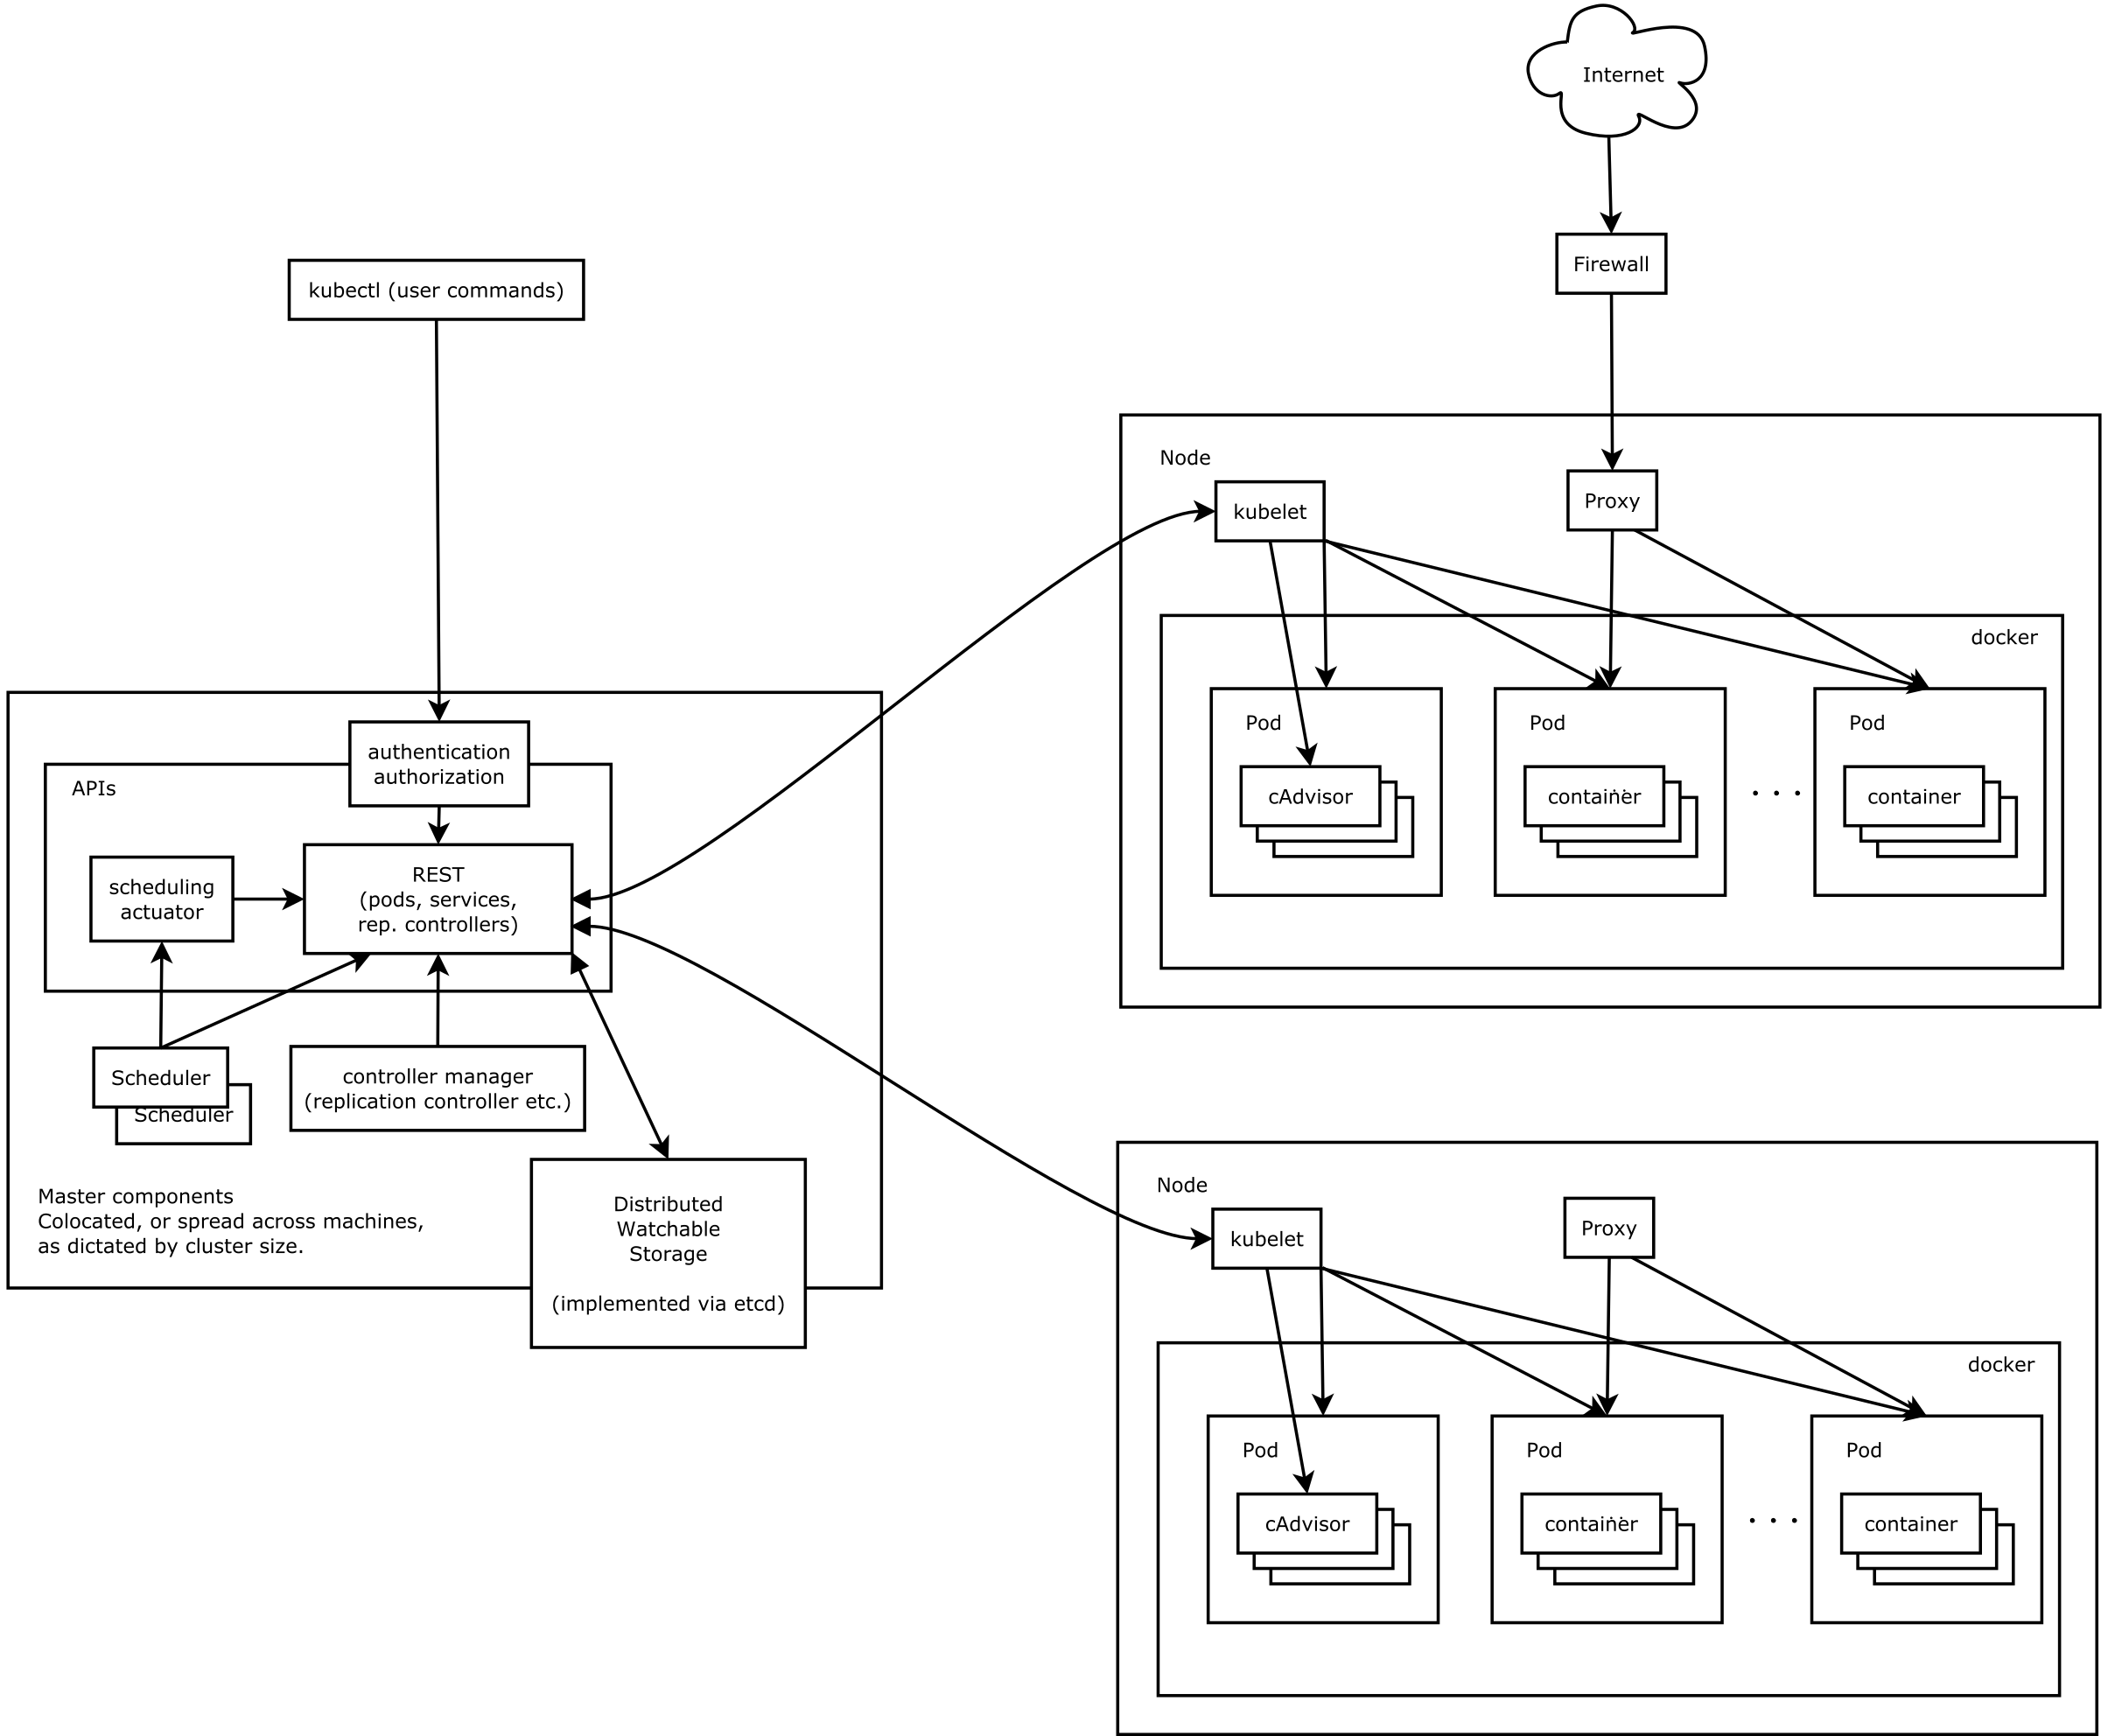
How exactly does Kubernetes work?
/kubernetes_architecture.png)
As mentioned before, Kubernetes has a container cluster made up of several components, and each of these components is accessible via a REST API. There is a master server for running the various daemons. These provide services such as the API just mentioned, the scheduler and the controller manager. Calls from the REST API cause the state of the cluster to change. The CLI tool kubectl simplifies the process. It allows you to create new containers, perform deployments or even scale PODs horizontally (see below). To record the state of individual objects, Kubernetes also needs etcd. The Docker containers themselves run on what are referred to as nodes (or “minions”, as they used to be called). Communication between the master server and node are handled by the kubelet daemon, which runs on each node and responds to each command coming from the master server. Another component that is run on the node is the kube proxy, which handles the routing of network requests.
Key Kubernetes components
As mentioned, Kubernetes has its own concept for components. More are being added all the time, but the main components should be briefly explained.
POD
One of the most important Kubernetes components is the POD. A POD allows for the clustering of one or more dockerized applications. This is especially useful in the case of applications that have also been run in a conventional virtualization environment such as the same KVM host. Kubernetes therefore does not consider individual containers but always PODs instead (of course it’s also possible to run only one container in a POD if desired). Docker containers in a POD share different Linux namespaces, including the network namespace. This enables applications to communicate via the ‘localhost’ interface. If you want to use volumes, these can also only be used with individual PODs. Each container in the POD is granted access to the volume. Each POD has its own private IP address. However, these IP addresses may change when restarting the POD and should therefore not be used for services.
Nodes
A node (or minion) is used to run the PODs described above. A virtual or physical server can be used here. The node itself does not necessarily require public IP addresses. Kubernetes differs from docker in terms of its network concept in that the following criteria must be met:
- Each POD can communicate with any other POD (including on other nodes) without using NAT.
- Each node can communicate with any POD (including on other nodes) without using NAT.
- The IP address seen by a POD is also the same IP address other PODs see (no masquerading). There are various techniques for achieving this. We have opted for the flannel version (with the ‘host-gw’ backend).
Labels
The various Kubernetes components can be given labels. These consist of key value pairs. For example, you could assign a POD the label ‘app: nginx’. The label is then used by other components for the purposes of selection. In other words, labels link different components with one another.
Services
Because the IP addresses of PODs can change constantly, the component service was added to Kubernetes. It ensures that a service of a POD (or group of PODs) can be reached using a static IP address. What is referred to as the service IP address is based on a previously defined private IP address range (which is different from the POD address ranges). The labels are used to link the service with the POD. In other words, the service uses the label to select the POD to which it will send requests.
By nature, service IP addresses can only be reached within the cluster. This involves diverting the request to a service IP address via iptables to the kube-proxy, which listens on a certain port. The proxy then forwards the requests based on the service declaration.
To make services available externally, the NodePort type of a service is used. A port is (automatically) selected from a predefined range (default: 30000-32767) and used in combination with the main IP of the node. If requests are then received on this IP port combination of the node (e.g. from a load balancer), they are automatically forwarded via iptables to the kube-proxy daemon, which then passes on the request to the PODs. Here it should be noted that all nodes of the cluster use the same port and that the requests are automatically forwarded to all nodes that are running the respective POD. A load balancer can therefore be used to forward the request to all nodes in the cluster, without having to worry about the actual location where the POD is running.
Replication controller
This component ensures that a certain number of PODs are always running. If you do not use a replication controller to start PODs, they will not be restarted automatically if an error occurs. The replication controller is also used to carry out deployments. This involves creating a second replication controller to gradually start new PODs. Meanwhile, the original replication controller gradually reduces the number of PODs it is running in order to ensure that there are always a sufficient number of PODs available and no disruptions.
Volume
Kubernetes supports the persistent storage of data in PODs. Volumes mounted in the respective POD are used for this purpose. Different backends can be used:
- Amazon Elastic Block Store
- nfs
- iscsi
- glusterfs
- rbd (ceph)
- git
Glusterfs and NFS are of particular interest here because they support simultaneous read and write access from different nodes.
Experiments with a test cluster
Using our collective knowledge of the different components, we set up a Kubernetes cluster. This was quite easy and fast. Using a setup script, a central machine copies all of the necessary binaries to the master server and nodes. In actual productive operations, a package would certainly be required, but a setup script can be used for a test installation. PODs can be created once the cluster is set up.
This can be performed using kubectl and YAML files. In the following example, a replication controller that starts 5 nginx PODs is created:
apiVersion: v1
kind: ReplicationController
metadata:
  name: nginx-test-controller
spec:
  replicas: 5
  selector:
    app: nginx
  template:
    metadata:
      labels:
        app: nginx
    spec:
      containers:
      - name: nginx
        image: nginx
        ports:
        - containerPort: 80
The POD definition to be used when the POD is created by the replication controller must be specified in the template. In addition, after starting the PODs, they will not be accessible via a static IP. A service must be defined first:
apiVersion: v1
kind: Service
metadata:
  name: nginx-http-service
spec:
  ports:
  - port: 8000
    targetPort: 80
    protocol: TCP
    nodePort: 30001
  selector:
    app: nginx
  type: NodePort
All requests to port 30001 will now be forwarded to the appropriate PODs on each node (via round robin). In addition, a cluster IP which accepts all requests on port 8000 is created and forwards them on to the PODs. However, this IP is only reachable within the cluster.
We also checked to see how quickly PODs can be transferred from a faulty node to a different node. This took several minutes with the default settings. Manually changing the timeouts sped up this process somewhat. Unfortunately, in the tested version there was still no easy way to change a node to ‘maintenance mode’; the status of a node has to be manually patched.
The biggest problem encountered so far for productive operations (in a multi-tenant cluster), however, is that firewall rules are missing in the cluster. Each POD can use and reach the services of the other PODs. While a namespace resource does exist (for more information, click here), so far it has only been relevant for resource quotas (CPU, memory, etc.) or the scope of resource names in the cluster. A firewall feature request is already pending, however.
Conclusion
Kubernetes is developing very rapidly and already offers many great possibilities. We like the ideas, and a cluster can be set up relatively quickly. Unfortunately, it is not possible to configure firewall settings between the individual PODs, making it impossible to use multi-tenant clusters. The new multi-home networking feature in Docker version 1.9 may offer a source of new input here. In any case, we will definitely keep our eye on the development of Kubernetes.
Sebastian Nickel works as a Senior Linux System Engineer at nine.ch. He is part of the „systems“ team which is responsible for the continuous development of our infrastructure and Managed Services.


